Objective.
Install updated Nvidia GeForce4 420 Go graphics driver in Ubuntu 7.10 (Gutsy) on Toshiba Satellite Pro 6100 laptop.
Tasks.
Install required packages
Enable restricted driver
Configure xorg.conf to use new driver
Edit EDID file for correct screen parameters
Recommendations.
As with any installation on any computing platform, it is good practice to ensure important data is backed up in case unforeseen difficulties arise.
Review all instructions on this page before you begin.
Text file editing from the command line.
This guide uses the Nano application for text editing because of its simplicity. Alternative text editors are available. Basic Nano key combinations to remember are CTRL-O to save and CTRL-X to exit.
Page dependencies (ensure you have access to everything you need before you begin).
The following packages will be required as described in the Procedure section:
build-essential
linux-restricted-modules-[arcitecture] (686 for Pentium/Celeron machines)
linux-headers-[arcitecture] (686 for Pentium/Celeron machines)
ghex (a Hex editor for Gnome - others are available if preferred)
Nvidia driver applicable to architecture and GPU.
Page format.
Text in this format indicates command line entry by the user.
Text in this format indicates an error returned by the system.
Text in this format indicates a normal return from the system.
Beware of similar characters such as 1(one), l(lowercase L), 0(zero), O(uppercase 'o'), | (pipe – Shift '\' usually).
Text enclosed in [square brackets] indicates a build-specific variable such as a version number or user name.
Conditions.
This page was written for Ubuntu 7.10 (Gutsy) and may contain content or instructions that are not relevant to other distributions. Testbed builds were freshly installed and updated on 19/10/07 which was the date of testing.
This information is provided for guidance only. Use of these instructions is deemed to be at your own risk.
R3UK Limited welcomes comment on this information but cannot guarantee a reply and provides no technical support. Please use one of the many dedicated Linux forums or IRC channels if you require assistance.
Text colours and fonts used in the formatting of this page relating to command input and output are used for illustration purposes. Actual command line colours and fonts will vary according to individual system preferences.
GUI instructions were written for the Gnome desktop environment and may differ for other desktop environments.
This page was written specifically for the Toshiba Satellite Pro 6100 model of laptop with 32MB GeForce4 420 Go graphics chipset and 1600x1200 screen. The information on this page may not be relevant to other hardware platforms.
Procedure.
Just one week after writing about my efforts to get Feisty running on my Toshiba laptop, the new version of Ubuntu (7.10 Gutsy) comes out and some differences in installation are required.
For a start off, the Gutsy live CD doesn't work in full graphics mode with this laptop. Instead, boot from the CD in safe graphics mode and then install as normal.
After installation, the laptop will work just fine at 1600x1200 resolution. This is because it will be using the supplied open source 'nv' driver to power the Nvidia hardware. While this is all well and good for 2D operation, you won't get any 3D shenanigans out of the nv module which means your fancy 32MB graphics card with it's whizzo 3D capabilities is reduced to doing what a 2MB card could have done. You'll soon notice the problem - no GL screensavers, no 3D games and even screen updates in programs like OpenOffice can look broken up (try selecting pages of text in the Spreadsheet application and you'll see your screen flickering like a strobe light!)
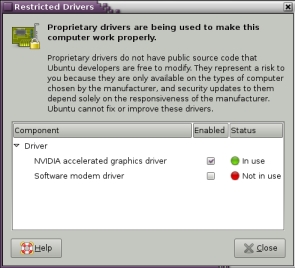
After installation howveer, Gutsy should inform you that there is an Nvidia restricted driver that you can enable (if it doesn't, go to System/Administration/Restricted Drivers Manager. Enable the Nvidia driver but don't restart the computer just yet!

If you've just installed Ubuntu, you'll find some of the repositories are not available for use. You'll need to open them up in order to get access to some of the required packages. While still in Gnome, open Applications / Accessories / Terminal and use the following command to edit your sources list:
sudo nano /etc/apt/sources.list
Remove the hash '#' from the beginning of all the named repositories, for example change:
# deb http://gb.archive.ubuntu.com/ubuntu
to:
deb http://gb.archive.ubuntu.com/ubuntu
...obviously if you're not in the UK your repositories may be named differently. Press CTRL-O to save changes and CTRL-X to exit from Nano. Now enter the following command to check for updates:
sudo apt-get update ... or use System/Administration/Update Manager to check for and apply outstanding updates.
Next, the ghex Hex editor package needs to be installed, either through Update Manager or by issuing the command sudo apt-get install ghex
Now restart the computer so the Nvidia restricted driver takes effect. When it comes back to the graphical login screen however, you'll probably find it isn't working. In my case I got a 'trippy' white and black fading screen. This is because the driver thinks it detects a CRT screen on the VGA port and tries to use that in preference to the laptop screen.
To correct this, enter sudo nano /etc/X11/xorg.conf and add the following line to the Device section to tell it to use the Digital Flat Panel (LCD screen):
Option "UseDisplayDevice" "DFP-0"
While in xorg.conf, scroll to the 'Screen' section and set the DefaultDepth to 24 if it isn't set already. Save and exit when editing is complete.
Now issue a sudo reboot command to restart the computer. If all is well you should get a graphical login prompt. The resolution won't be correct though (1024x768 in my case and not the 1600x1200 I want). If you don't get a graphical login, check the Xorg.0.log to see what reason is given. Different laptops, drivers and chipsets may yield different results. As I'm writing this about my specific laptop I will continue with my observations.
Here's where it gets really interesting. The reason I don't have my 1600x1200 resolution is because of my pesky EDIDs. This stands for Extended Display Identification Data and is a mechanism for a display to provide information to a graphics card on what it's capabilities are (size, refresh rate, etc.) More info on EDIDs can be found on Wikipedia here. In my case, the graphics card and the screen aren't on the same wavelength (so to speak) so my GeForce thinks my screen isn't capable of 1600x1200 resolution and refuses to allow it even though that resolution is specified in xorg.conf. There are numerous options to add to Xorg to ignore EDIDs, ignore EDID DPI's, ignore EDID frequencies, ignore EDID modes, set specific modelines - they're all in the Nvidia Readme and none of them worked for me. The only answer I could find was to edit the EDID settings themselves with a hex editor. To do this, log into Gnome. Press Alt-F2 for a Run box and enter nvidia-settings which should launch the Nvidia X Server Settings application.

Click on DFP-0 (or whatever your screen is called) and click the Acquire EDID button. Save your EDID file to your Desktop and call it EDID-current.bin (or something).
Quit Nvidia-settings and open another Run box. Type ghex2 to open the hex editor installed earlier. From within the hex editor, open the EDID-current.bin file you saved.

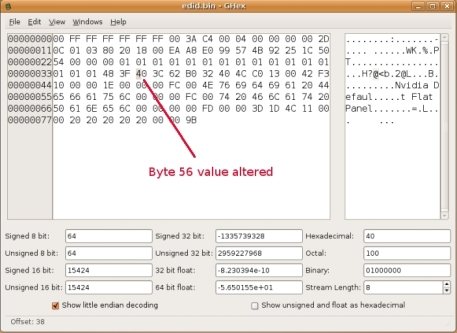
The hex pairs represent various settings to do with the graphics configuration. Contained within is information such as screen size and frequency as well as detail like serial number and manufacturer. Here's an example - bytes 16 and 17 represent week and year of manufacture respectively with the year count starting from 1990. Counting along the top line and calling the left most byte 'zero', we can see that byte sixteen is 2D and byte 17 is 0C. These are hex numbers so convert them to decimal and you get 45 and 12. The 45 indicates manufacture in week 45 (November) while the year is represented as 1990 plus 12 - i.e. 2002. I can therefore see that my chipset was manufactured at the end of 2002. Another example are the 20 and 18 hex pairs five columns from the left and one down. In decimal these convert to 32 and 24 and represent the physical screen size, horizontally and vertically in centimetres. I'm interested in byte 56 however - The 'Horizontal Active' value (in pixels). Mine is listed as 34 hex which converts to 52 decimal. This value is wrong!
To work out the correct number, take the desired horizontal setting in pixels (1600 in my case) and convert to hex. This gives me the number 640. Take the last two digits (40) and replace the value in byte 56 with these digits.

Use File/Save As to save the modified EDID file. Plonk it somewhere safe where it won't be deleted. I saved mine as edidnew.bin onto the desktop and then placed it in /etc/X11 so it would sit with xorg.conf. You might not have permission to copy the file over from Gnome but from a terminal just issue the command:
sudo cp /home/[username]/Desktop/edidnew.bin /etc/X11/
Now log back out of Gnome and use CTRL-ALT-F1 to get to a command login. Log into the computer and open xorg.conf for editing with sudo nano /etc/X11/xorg.conf
In the Screen section enter the following line (assuming your edited EDID file is in the same path as mine):
Option "CustomEDID" "DFP-0:/etc/X11/edidnew.bin"
Save your changes and exit Nano.
Restart Gnome with sudo /etc/init.d/gdm restart
Hey presto! 1600x1200 ! Log in and try out some OpenGL screensavers or some 3D gaming!

Useful Commands:
The following commands may come in helpful for faultfinding with a graphics issue - I know I found them helpful while researching the above.You'll need sudo in front of most of them...
dpkg-query -l | grep [name] Check for installation of a named package
dpkg-reconfigure -phigh xserver-xorg Creates a new xorg file based on settings you enter
dpkg-reconfigure xserver-xorg As above but with more options available
sh [package] --uninstall If you need to uninstall a driver you previouslly installed
gtf [hresolution] [vresolution] [refresh] -x For generating Modelines to set specific monitor modes in xorg
Useful Links:
EDID information on Wikipedia
Procedure for installing Nvidia drivers in Ubuntu 6.06/7.04
Did the information on this page help you? If so, please help to fund this site by clicking one of our sponsored ads...
