
Apple do make some great looking kit but it can be a real bind when it comes to servicing. Forget pulling a screwdriver out of the box, it's head scratching time. It's especially annoying on something like this which has something of a flawed design to begin with. There simply isn't enough strain relief on the mouse cable resulting in failure at the mouse end. Too much twisting and turning from everyday use means that eventually one of the very thin wires inside the cable will snap leaving your pointer stuck on the screen.
That's not to say Apple's stuff is shoddy. I bought a cheap A4 Tech optical mouse for my Fujitsu laptop and that suffered from the same problem within months, whereas the Apple Pro mouse was in 9-5 business use for a couple of years before it failed. The difference however is that the A4 mouse was much cheaper, could be opened after removing one screw and was fixed within fifteen minutes. The Pro Mouse however requires an hour, a hacksaw, a knife and some glue. If you deal with a lot of these then forget it, throw them in the bin and buy a replacement. I didn't want to do that though as I knew it would be a simple repair (once the case was open) and I don't like to throw away something that can be made to work again with a little effort.
Anyway, enough of my waffling, here's the usual disclaimer followed by the instructions...
It's important to note that messing around in any electrical device is dangerous. If you are not technically minded or confident in your abilities, don't attempt this procedure. These instructions are just a guide - you follow them at your own risk. You should also be careful handling the internals of any electrical device. You should follow antistatic precautions or you may cause damage. One other word of warning about this particular procedure - watch your fingers if splitting the case with a knife like I did below, it's very easy to slip up on this thing. Also note that this disassembly is destructive in places. You will have to break retaining tags and saw through part of the mouse housing. Only attempt this on a dead mouse - it's not worth trying to open up a nice shiny working model (unless you're reeeeally curious to see inside).
1. Using a wide bladed knife I first popped out the white plastic oval on the underside. This didn't give me much trouble and I didn't break any of the retaining posts (although it never held back in place properly without glue afterwards). Try and prise it up evenly rather than concentrating on just one part at a time.

2. The underside of the oval showing the retaining posts

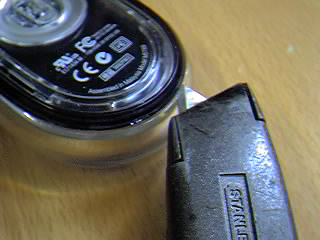
3. Here I used a sharp Stanley knife to carefully run along the seam between the graphite coloured plastic and the clear plastic top of the mouse housing. There are eight retaining tags (four towards the top and four towards the bottom). These need to be split by the knife. They made a satisfying 'crack' as each one went. Run the blade around several times to try and split the case apart.
4. After running the Stanley knife along the seam several times it was weakened enough to be removed.

5. Next you need to hacksaw though the thin graphite coloured strip that runs around the mouse. This needs to be done in two places, once on each side. Do it just behind each of the protruding 'wings'.

6. Using a small flat-blade screwdriver, release the clips (arrowed) which should allow only the lower half of the unit to be prised out by a few millimetres (see step 7).

7. Prising out the lower half of the unit with a small flat-blade screwdriver after the clips have been released.

8. We will need the wire out of the way to pull the mouse apart so cut off the cable. Make sure the cut is as near to the point of failure as possible (you don't get much cable to play with on these units). If you're not sure then the failure point is probably close to the mouse and may look like a slight kink or twist. Look carefully at the clear plastic cable and see if you can see damage to the screen wire inside. In the picture below the damaged area is below the cutters (the kink is just about visible).

9. With the cable removed you can now slide the underside of the mouse out by pushing the protruding 'wings' through the hacksaw cuts made earlier. The graphite surround is just flexible enough for the mouse underside to slide out but don't overdo the angle or it'll snap.

10. The mouse with top cover removed.
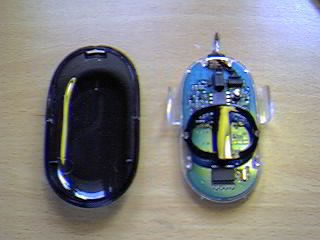
11. From here you can carry out the repair. The original cable feeds into a connector on the top side of the mouse PCB. This connector is surface mount and can't take much soldering iron heat so be very careful if soldering the wires directly to it. I chose to reuse the plug with the wires already feeding into it so I spliced them together with the ends of the cable I had cut earlier and then insulated them. Don't leave too much cable inside the mouse or it will get in the way of the switch. Also remember to feed the cable through the access hole at the front before soldering or you won't get it back together. I left a small knot in my cable on the inside of the unit to act as a strain relief rather than have the strain pulling on my spliced connections. It's not the best way of doing it but at least if I need to open the unit up again the hard work is already done.
Finally, reassembly is pretty much the reversal. Just make sure that when you're sliding the underside back into place you get the tag at the front over the top of the lip of the graphite coloured shell part of the casing. Ensure the repair works and that the mouse clicks properly as you will need to superglue the two case parts together and the white oval piece back into place once finished.

Did the information on this page help you? If so, please help to fund this site by clicking one of our sponsored ads...