One of the reasons I haven't uploaded many articles lately is because I've been tasked by she-who-must-be-obeyed with some house redecoration and rearrangement projects which has left me wielding paintbrushes instead of screwdrivers and shuffling furniture instead of doing fun things with computers.
One of the items on the toilet roll she had listed all my jobs onto was to lay more lagging in the loft and clear out some of the junk that's lurking in there which is where I came across a PIII laptop gathering dust. A duff keyboard, dead battery and tatty casing meant this thing had no reuse or resale value but I knew there was more life left in the old girl..... if only I could think of something useful to do with it.....
Now I knew the wife wanted one of those digital picture frames for displaying the family snaps and I'd been toying with the idea of making one for a while so this seemed the perfect candidate for the job.
The great thing about using an old laptop for something like this is you get a bigger, higher resolution screen than a proper off-the-shelf digital picture frame (DPF) and because this laptop is WiFi enabled I can copy pictures onto it over my wireless network rather than plugging in memory cards. This is handy for us as we have two digital cameras with different memory cards and store all our pictures on several computers (although mainly on our one Windows PC). By configuring a shared folder on the DPF computer I can map to it over the wireless network from any other computer and copy images over.
Of course, if I wanted a card reader then there's nothing stopping me installing one into the frame as this laptop has both USB and a built in SD reader. For this particular project however, I'm not going to bother.
Hardware installation.
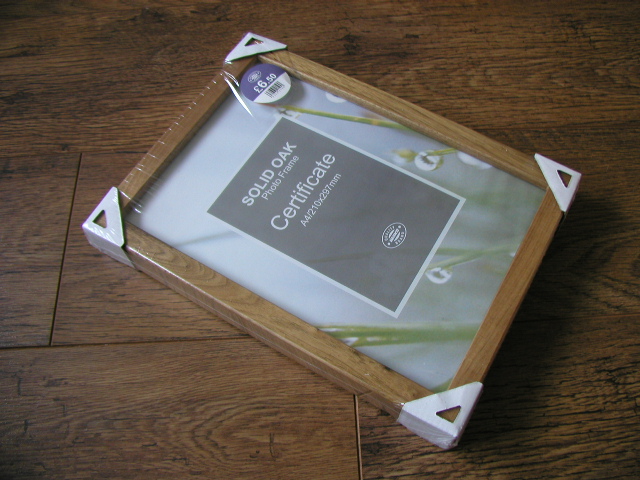
I'm not going to get too specific on the hardware used in this project because the computer itself is largely irrelevant as any old laptop capable of displaying photos can be used for this task. My chosen laptop happened to be ideal for the project as it was a lightweight slimline machine sporting an LCD screen and surround the same size as a piece of A4 paper meaning it would fit without adjustment into any A4 picture frame. The oak A4 certificate frame I chose was the only part I had to buy for this project costing £6.50 from Wilkinsons. At approx 3.8cm depth, this frame gives me enough space to mount the screen (encased in its surround) along with the motherboard behind it.
The first thing to do was to paint the tatty metal screen surround using copper Hammerite to neaten it up and give it a colour that blended in better with the surrounding frame. Next I disassembled the laptop and discarded the bits I didn't need – namely keyboard, trackpad, modem port, battery and PCMCIA interface. Note that it's worth checking your chosen laptop will function without these parts before binning anything!

In the above picture I have removed the LCD screen from it's surround and drilled holes through the rear of the surround (the laptop lid) so I could bolt the motherboard to the back of it. The bolts in this picture are labeled 1, 2 and 3. This meant the motherboard was now effectively mounted on the metal laptop 'lid' - with the cardboard from a ten pack of Carlsberg underneath it as an electrical insulator! I had to cut a quarter of the laptop lid away using a jigsaw (lower right of the picture) so that the wires from the LCD panel (4) could reach to where the motherboard was now mounted.
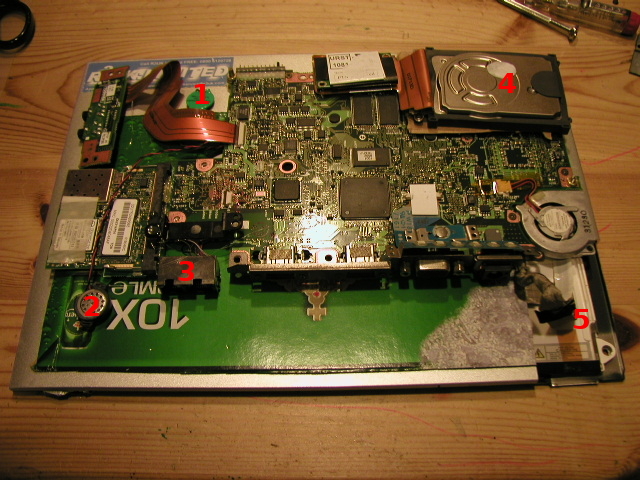
In this picture some loose items, namely the CMOS battery (1), internal speaker (2) and Ethernet port (3) are shown hot-glued onto the laptop lid. The hard drive (4) was hot glued onto the motherboard with some cardboard in between to provide electrical insulation. The LCD cables (5) have been connected to the LCD panel which has been fitted back into place on the other side of this monstrosity (you can see part of the rear of the LCD panel in the lower right section).
I had wanted to use a CF card as a solid state drive rather than using a hard drive, however this laptop uses a 1.8” drive and I only had a CF to 2.5” HDD interface converter so I had to stick with the laptop hard drive. While it does whirr, it's not loud enough to be noticeable or problematic.
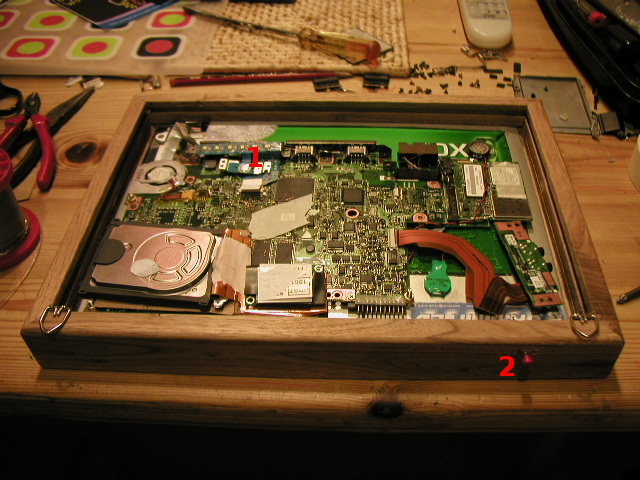
In the above picture the whole assembly has been rotated 180 degrees and slotted into the frame. The power switch on this particular laptop consisted of little more than a sprung metal plate mounted onto a plastic ribbon. Depressing the plate shorted out contacts on the ribbon and powered up the laptop. Unfortunately this switch was deep inside my DPF (1) and the ribbon was too short to bring it nearer the edge or orientate it into a position where it could be actuated from outside of the frame. As I couldn't solder directly on to the plastic ribbon, I had to trace the contacts from the switch along the ribbon and onto the motherboard where I was able to solder a couple of very fine wires into place onto some tiny surface mount points. A hole was drilled into the top edge of the frame and a push-to-make switch scavenged from my junk box was fitted (2). This switch was connected to the wires placing it in parallel with the laptop power button to allow the DPF to be switched on or off externally. The mounting hooks can also be seen attached to the frame in this picture allowing it to eventually be hung from the wall by two nails. After this picture was taken, the two WiFi antennas were connected to the WiFi card and run around the inside of the frame (some laptops have the antenna run around the laptop screen but not this one).

It's PM on Saturday. Very very PM. Still, assembly is complete and it's on the wall. I've chipped out the plaster to run the power cable and then stuffed the channel full of filler.

A couple of hours into Sunday sees the plastering finished and repainted making a very neat and effective installation. Even the wife who normally buries her head in her hands when I get a hair-brained idea for a project thinks this is one of the better ones!
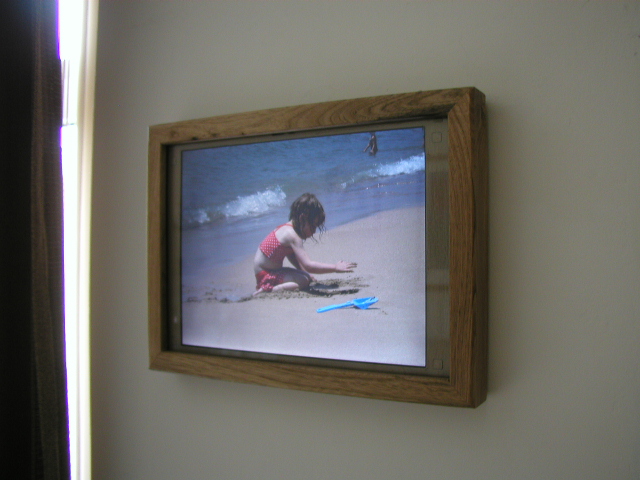
Software installation.
The machine I used was a PIII 866MHz laptop with 256MB RAM and a 20GB hard drive. Not the fastest spec but I knew it would run Ubuntu so the first job was to install it using PXE as there was no CD drive. Before ripping anything apart I wanted to make sure the computer was up to the job of displaying a photo slideshow so I made sure everything was configured before work on the hardware commenced.
During the PXE installation I selected OpenSSH server, Samba Server and Ubuntu Desktop as components to install. SSH would allow me to make configuration changes remotely after installation, Samba would handle the file sharing and I planned to display the pictures using the built in GL-Slideshow screen saver module from the GUI.
Ubuntu installed with all hardware recognised and Gnome as the window manager. Performance seemed fine but I was disappointed with the Gnome-Screensaver app as it isn't particularly configurable. Using Synaptic, I removed Gnome-Screensaver and instead installed xscreensaver and xscreensaver-data-extra. Xscreensaver has many more options than Gnome-Screensaver providing more functionality for the GL-Slideshow module.
I also installed Fluxbox using Synaptic. I hadn't played with Fluxbox much before but it's a nice lightweight window manager that loads up quicker than Gnome and uses less of the computer's resources. To try out Fluxbox, install it via Synaptic then log out. From the login screen select Options/Select Session, choose Fluxbox and click Change Session. When you log back in you'll be greeted by the minimalist Fluxbox desktop instead of Gnome. One point to make is that Fluxbox is broken under Gutsy as the menus don't work. To fix it I had to type sudo update-menus from a command prompt then log back in to Fluxbox.
With Fluxbox working there were a few extras I had to configure.
As there would be no keyboard or mouse on the end product I had to ensure the power button would be enough to switch the thing on and off without any other intervention. Under Apps/System/GDM Setup/Security I enabled autologin for the default user so that a password wouldn't be required to log in. I also adjusted the power management settings so the computer would shut down when the power button was pressed and the display wouldn't be put to sleep when idle.
To start the xscreensaver daemon at startup, I edited ~/.fluxbox startup adding the following line under “Applications you want to run with Fluxbox”:
xscreensaver &
The ampersand makes xscreensaver run as a background process. I also added the following lines to enable the Network Manager applet to run without authentication:
gnome-keyring-daemon &
nm-applet &
Upon restarting Fluxbox, the Network Manager applet appeared allowing me to assign an IP address and bind it to my wireless network.
I configured Xscreensaver to use GL-Slideshow only and pointed it at the default path for my profiles pictures (/home/saveryd/Pictures). Xscreensaver has pan/zoom and fade options and I wanted to use them but I guess my graphics hardware wasn't quite up to it as such effects were jerky. I turned all that off, set the time between slide changes accordingly, disabled the Xscreensaver power management function and set Xscreensaver to activate after one minute.
The last thing to do was configure Samba so that my Pictures folder was shared over my wireless network allowing me to copy across new pictures on the fly. As this is just a picture displaying box, I have no need for tight security on it so I kept the contents of /etc/samba/smb.conf pretty simple as below:
[global]
; Generic server settings
netbios name = R3DPF
server string =
workgroup = R3LAN
announce version = 5.0
socket options = TCP_NODELAY IPTOS_LOWDELAY SO_KEEPALIVE SO_RCVBUF=8192 SO_SNDBUF=8192
passdb backend = tdbsam
security = user
null passwords = true
username map = /etc/samba/smbusers
name resolve order = hosts wins bcast
wins support = yes
syslog = 1
syslog only = yes
[homes]
valid users = %S
create mode = 0600
directory mode = 0755
browseable = yes
read only = no
veto files = /*.{*}/.*/mail/bin/
#The heading below will form the name of the share
[piccies]
path = /home/saveryd/Pictures
browseable = yes
read only = no
guest ok = no
create mask = 0644
directory mask = 0755
I then added a samba user giving the user a suitable password:
sudo smbpasswd -L -a saveryd
... and enabled that user:
sudo smbpasswd -L -e saveryd
A quick Samba restart so the new configuration comes into effect....
sudo /etc/init.d/samba restart
.... and my digital picture frame was now contactable from my Windows box by mapping a drive to \\192.168.0.70\piccies or \\r3dpf\piccies (the fixed IP address/hostname and share name I set when configuring the installation). When new pictures are copied into the shared folder, GL-Slideshow will pick them up without requiring any intervention (i.e. no need to restart the daemon or the computer itself).
Update 16/11/08 - Bluetooth support.
All has been working well in the digital picture frame world since construction six weeks ago. I decided to add some extra functionality to my frame today by plugging in a spare USB Bluetooth dongle to one of the USB ports hidden at the rear of my DPF. This would allow me to transfer pictures taken with the camera of my Nokia E90 directly to the DPF without having to first transfer them to a computer and copy them into place using Samba. Here's how I did it....
First, I needed to install the gnome-bluetooth package to enable file transfers. This can be installed via Synaptic or with the command sudo apt-get install gnome-bluetooth
Next I was able to pair the phone with the DPF by initiating pairing from the phone and selecting the DPF from the list of available devices. My default passcode was 1234 however this may vary (check /etc/bluetooth/hcid.conf to see what passcode is set).
With the phone paired, I needed a Run box to be available in Fluxbox so I could test gnome-bluetooth. I couldn't find one (and Alt-F2 didn't do anything), so I ran sudo nano ~/.fluxbox/keys and added the line:
Control F10 :ExecCommand "fbrun" then I saved changes and restarted. After the restart I was able to open a Run box by pressing CTRL-F10. In the Run box I entered gnome-obex-server and verified that its icon appeared in the task tray. Now I was able to select an image from the phone and send it via Bluetooth to the DPF. By default, gnome-obex-server throws up a prompt to confirm file transfer and saves to ~/Desktop.
To change the default save path and get rid of the file transfer prompt I again opened a Run box and ran gconf-editor. By expanding Apps / Gnome-obex-server I was able to untick the Notification box and change the value of 'savedir' to the path that the DPF was using to display pictures (/home/saveryd/Pictures in my case).
Finally, I edited ~/.fluxbox startup adding the following line under “Applications you want to run with Fluxbox”:
gnome-obex-server &
Upon reboot, the gnome-obex-server applet appeared in the task tray automatically. Now I can zap pictures from my E90 at any time simply by using the Send via Bluetooth option on the phone.
Update 19/02/11 - Hardware rebuild.
Despite running happily for two and a half years, today I decided to give my digital picture frame a shiny new upgrade (which actually means scrapping everything except for the wooden frame, glass front and power switch!)
There are a few reasons for this. Firstly, getting pictures onto the old one was no longer so easy as Bluetooth had packed in. It was through a software fault rather than hardware but I wasn't able to get to the bottom of it despite some investigation. Secondly, WiFi had also given up the ghost following a beefing up of my wireless security which left the chipset in this old laptop unable to cope without some kind of firmware upgrade that I didn't have! The main reason for the change however was that I came into possession of a newer candidate laptop that would do the job better. The original laptop dates back to c2003 while this new one is a 2008 model. Despite not being too old at the time of writing, its life as a laptop was over as it was missing its battery, the casing was beaten up and the power switch broken. Probably all repairable but I don't want to throw money at it and besides, there are advantages for me stripping it from its case and using it for this project. For a start, I can use the pan/zoom function of XScreensaver to give my pictures some movement which the wife says makes her seasick but which I always wanted to do with the old one if only it were capable. Also, the LED backlit display is brighter, more energy efficient and is viewable from greater angles while the motherboard allows booting from a USB flash drive eliminating the noise and power consumption of a hard drive. Fortunately it uses the same power supply as my original model meaning I don't have to chip out the wall to replace the supply cable.
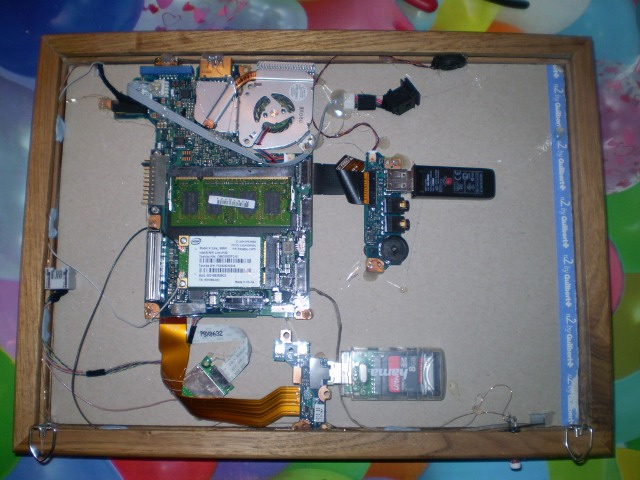
As before, physical construction simply consisted of stripping the component parts of the laptop that were required and leaving out the bits that were redundant such as the trackpad, keyboard, LED indicators, SD card reader, Expresscard slot and optical drive. The motherboard was then hot-glued onto the rear of the LCD screen along with the expansion boards for USB and Bluetooth. Fine wires from the power switch mounted on the frame were soldered onto the motherboard power button contacts and the two USB slots were fitted with the flash drive and a wireless keyboard/mouse dongle.
The new motherboard. Much smaller than the old one and a lot more powerful (please excuse the party tablecloth)
Software installation was different this time around. I used another computer to drop Ubuntu 10.10 to the flash drive making it a bootable persistent install and this time I left Gnome as the desktop manager rather than using Fluxbox. With this being a more powerful machine, performance isn't going to be a problem this time around so I didn't want to spend too much time slimming down the OS. Using Gnome's Startup Manager I disabled anything that I wasn't going to be using and installed XScreensaver in place of Gnome-Screensaver as it has more configuration options. I also replaced the built-in Gnome Bluetooth Manager with Blueman as that would allow me to send pictures from Bluetooth devices such as my mobile phone to the Public directory while Gnome Bluetooth Manager insists on using the Downloads folder. The advantage of Public is that with Gnome-User-Share installed, the Public folder can be browsed over WiFi and Bluetooth without messing around with the likes of Samba or device pairing so I can make an ad-hoc connection from pretty much any phone or laptop and zap images over. By telling XScreensaver to display whatever pictures are in Public, any snaps I beam over will enter the rotation without any further configuration.
As before, updates were disabled and the thing was configured to log me in automatically and to switch itself off with a press of the power button so it can all be started and stopped with a couple of button pushes and won't come to a halt because of any rogue messages or prompts.
The wireless keyboard/mouse transceiver was fitted so I could control the unit using my Logitech DiNovo Mini keyboard. One of the cool things I can do with this device, other than viewing pictures, is to have an SSH window open to this server so I can monitor the Apache logs. In fact, this effectively being a wooden-framed computer stuck to my wall, I can run all manner of programs as an alternative to it showing the family photos. Another example I intend to play with is Skype because a webcam is built into the screen surround. The speaker and audio chipset are also functional so by plugging a microphone into the MIC port my picture frame can now double up as a Skype video phone.
One last point.
Sanjay the stingy contractor likes to put the boot into all of my projects and his objection to this one is that a laptop recycled in this way would require more power and be more wasteful of energy than a normal digital picture frame. The larger screen, (comparatively) powerful CPU and GPU, powering of unused chipsets (such as audio, charge control and Ethernet) and the WiFi capability all add up to a unit that is thirstier to run.
While I take his point on the running costs being higher, I still prefer to see old technology being put to new uses. Besides, you could offset some of the running costs against the environmental impact of the manufacture, packaging and shipping of a new digital picture frame and also weigh in the negative effect of this old computer being scrapped instead of reused.....
........ oh piss off Sanjay, it's just an interesting little project, alright??!!

